Search This Blog

Showing posts with label destash. Show all posts

Saturday, July 27, 2013

Yoga mat bags

If you don't know this about me already, you need to know that I love yoga.  Everything about yoga--the message, the spirit, the teachings, the poses, and the way that it is part of everything in life.  My love of yoga ties with my love for yarn (now that's saying something, isn't it?).  As you know Matt just completed his yoga teacher training and he has been teaching me a lot about yoga and its foundations.  He specifically has been teaching me about Raja yoga and its 8 limbs.  I have been trying to abide by the yamas (the first limb that represents the social code) and the niyamas (the second limb that have to do with the 'self').  One of the yamas is Aparigraha which says that one should not hoard things and should be non possessive.  I do have a problem with this sometimes (evidenced by my growing yarn stash).  So I have been trying to work on this in various ways.  I've been gathering items to donate, trying to get rid of items that are unnecessary to me, and also trying to destash when possible.  I am definitely not an expert on the yamas or how to live by them, but I am trying my best.

So what does this all have to do with knitting and crocheting?  Well, I have been making yoga mat bags with my stash.  I am planning on "selling" them at my yoga studio very soon.  The yoga studio has a boutique and it would be a perfect place to sell these items.  So far I have made 4 different bags and have at least one more planned before I'm going to bring them to the studio.  I've used a bag for my yoga mat that I knit back in 2011 and I'm ALWAYS getting complemented about it.  I really like it--it is machine washable and dry-able and is perfect for quickly stashing a sweaty yoga mat.  However, there were things that I could improve on--the strap was too long and the drawstring tie would come untied or be a bit of a pain to tie.  So I improved on these things with the new bags I made.

Here are the first two I've made for the studio.  The purple one is crocheted out of cotton in a ripple pattern.  You can see how they feature a shorter strap and a drawstring that cinches closed when you pick up the bag.  That's my favorite part :).  The second one is knit out of acrylic and also features the same shorter strap and cinching drawstring!

I have two others--one that looks like a tree and a blue lacy one that I developed the pattern for.  I'll post those in another entry when I get some decent photos of them.  I'll also be posting the pattern for my lacy mat bag--so keep an eye on my blog for that :).


Wednesday, July 24, 2013

Baby Mermaid

Let's rewind to the beginning of the year.  One of my close friends was pregnant with her second child (I believe she was due in March).  She already had a boy back in 2009 and this time she was having a little girl!  I know she was super excited for dresses and other girly things!  I had crafted a few things for her son--a little puppy, a blanket, and some bibs--you can see the post here.  So, I obviously wanted to make various things for her daughter too!

I've been trying to be on a destash mission--which has worked some what, but I must admit that I've also purchased yarn...tisk tisk tisk, Jessica.  However, back at the beginning of the year I was TOTALLY on the "cold sheep" "use only from stash" bandwagon!  I've also been trying to use patterns that I already own, rather than finding something new or buying a new one.

So with that in mind, I found the cutest pattern from a Crochet Today! magazine to make for my friend's daughter!  The pattern is called "Mermaid Cocoon" and is from the July/August 2012 issue of Crochet Today!  I totally fell in love with this pattern when I first saw it.

I was pretty lucky that I had both mint green and teal yarn in my stash!  I just reversed the colors of the tail--making the teal the main color and the mint the accent.  I also had white and purple!  They are all simply soft yarns, so you can just imagine how soft and snugly this outfit is before washing and how much softer it will get!

I added little white buttons to it rather than colored ones.  I spent an awfully long time standing in the button aisle of Jo-ann's picking out the 'perfect' buttons :).

The construction of the garment is so interesting!  It is all made in one piece without seaming.  You start with the bodice, then work the arms, and then the tail portion.  It was so quick and only took me four days to make!  I'm so pleased with it and can't wait to see pictures of little Keira in it!


Monday, February 11, 2013

FO: Sweet and Swingy Dress

My friend Alyson is expecting her second baby in March--a girl!!  I'm so excited for her family and their upcoming addition.  I've been crafting away making a few things just for the occasion!  I've known Alyson and her family since I was in the 6th grade...so for like 18 years (WOW!)  I'm actually going to be in her sister Alexandra's wedding in October as a bridesmaid :)...Alex and I are yarn buddies and have been pals since we met in our 6th grade class...but I'm getting off topic.

Pattern: "Sweet and Swingy Dress" by Ellen Gormley which is available in the May/June 2009 issue of Crochet Today!

Yarn: TLC Baby Solid in powder pink with accents of Patons Beehive Baby Sport in Big Girl.

Hook Size: H, 5.0 mm

Size: According to Ravelry, this pattern runs REALLY small.  Since the baby isn't born yet, I figured that this wouldn't be too much of an issue and picked the 12 month size to make.

Notes: I have to say that I don't think this is a dress sized for a 12-month-old.  I don't have a baby to compare it to, but it just seems small...which is perfectly fine because the baby will only be a few months old this summer and maybe it will fit perfectly then!  I really loved making this dress.  The way to do the accent crab stitch around certain areas is genius!

I decided to add a little flower to the front of the dress.  I did this for two reasons-- 1) the back of the dress is identical to the front and I wanted to tuck my ends and start the accent colors on the back of the dress to make any finishing less noticble and 2) I wanted a little more detail and I didn't like the look of the three rounds of detailed edging on the bodice of the dress.  The flower is called the "10 minute flower" by Boomie and can be found for free online.  Scroll down to the bottom of the page for the English instructions.

What would I change if I was do make this again (which I will be doing)?  I would either make one shoulder have buttons so that it would be easier to put on/take off of the baby or try and incorporate a slit and button hole on the back of the dress.  The neck line is stretchy and wide-ish, but I just would feel better knowing it would be easy for mommy or daddy to dress the baby.


Sunday, February 10, 2013

FO: Baby Bibs

You'll see in the coming posts that I've been busy making a bunch of baby items.  It seems as if a lot of my friends have been asking me to make them stuff or having babies!  Here is one of my favorite patterns for a handmade bib.

Pattern: "I-Love-Stockinette Baby Bib" by Laura Treadway which is available as a free Ravelry download.

Yarn: Lion Brand Cotton-Ease in plum and berry.

Needle size: US 7

Size: As written, no modifications.

Notes: I really enjoyed using cotton-ease for these bibs.  I love the way that they turned out.  The drape is nice and they really don't curl that much.  I've used Knit Picks comfy worsted before, but I've found that they really curled a lot.  Also, I did not slip any edge stitches on these bibs and I think that might have helped them to not curl? Just a thought.


Friday, February 8, 2013

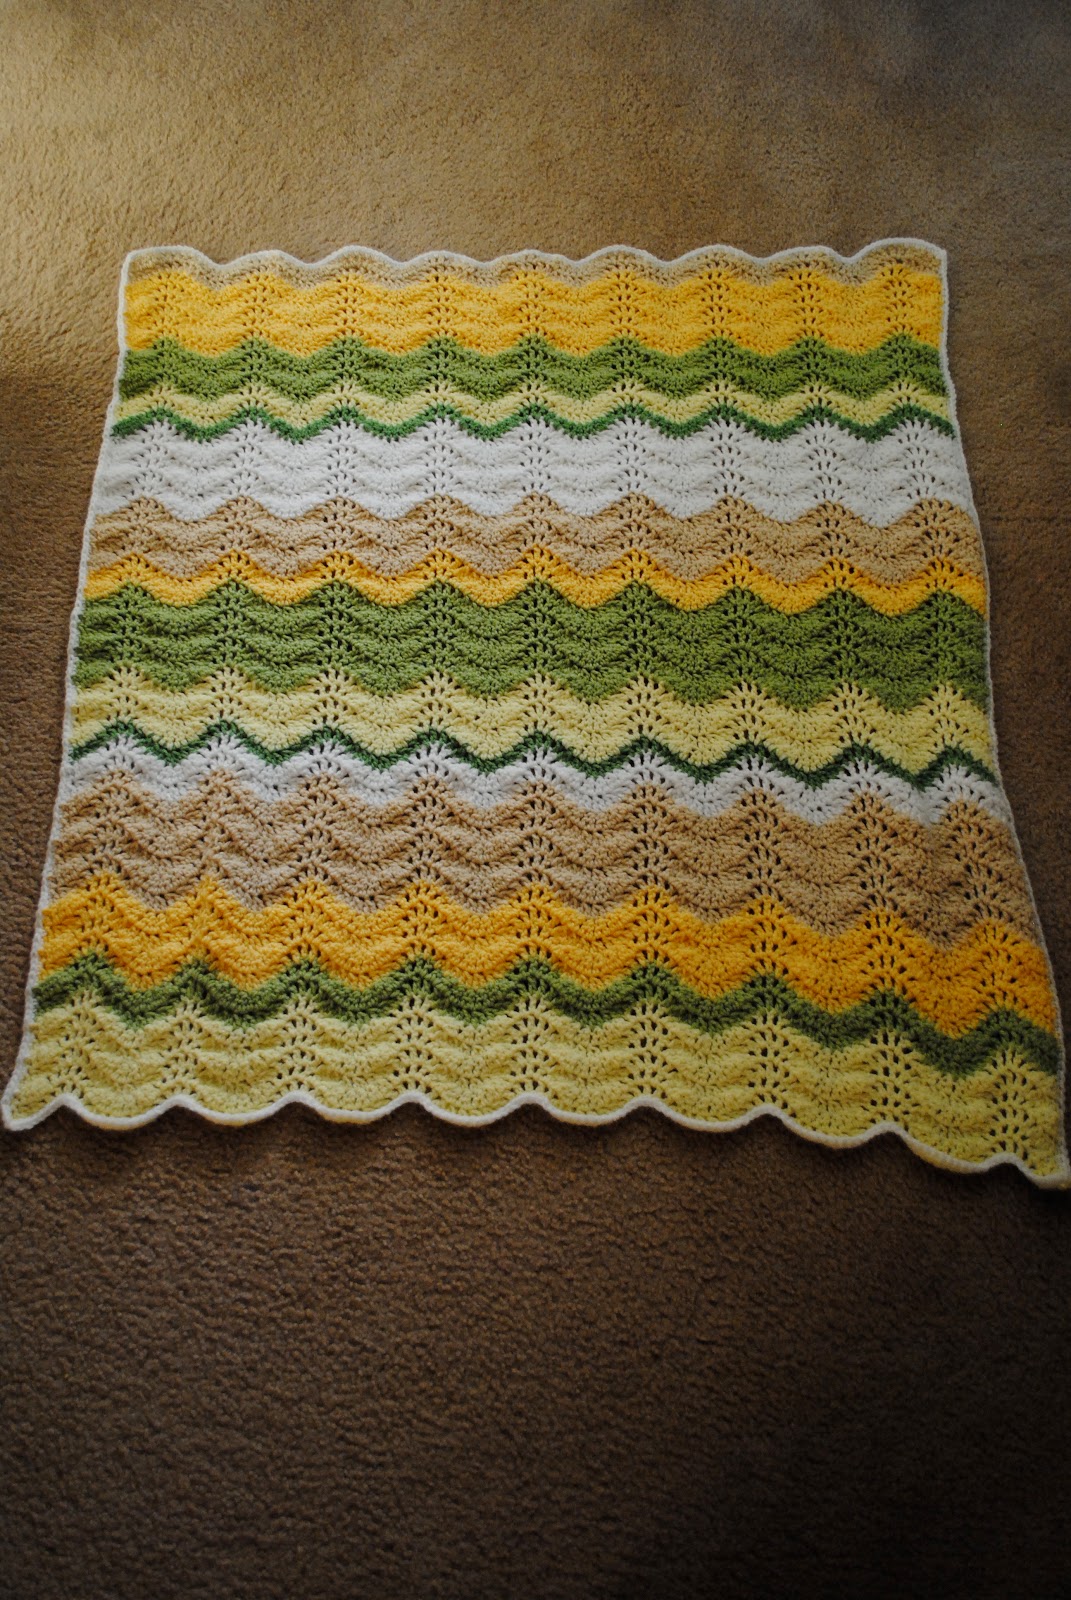
FO: Shades of Yellow and Green

My first project of 2013 (which took me just over a week) was a baby blanket.  My friend requested a ripple baby blanket in gender-neutral colors including yellow and green.  This is what I came up with.


Pattern: "Shades of Coral" by Jan Eaton, found in the book 200 Ripple Stitch Patterns

Yarn: Mostly Vanna's Choice and Vanna's Baby and a little bit of Lion Brand Pound of Love.  I picked greens and yellows first and then added beige and white to round out the colors.  I like using acrylic for baby items because of its softness, durability, and how easy it is to care for.

Hook size: I, 5.5 mm.

Size: I measured the blanket agains the quilt I used to have in MY crib as a baby ("Quilty").  Although I didn't record the finished dimensions, this blanket would be called "crib-sized" so it will won't be out grown for a while (if ever).

Notes: This was a really great and fast project.  I actually began at the end of December (12/30) and finished it by January 9th!  I tucked the ends in as I went along, so that I didn't have to worry about them after it was done.  The border is one row of single crochet.  I didn't do any adjustments along the top and bottom ripples as I made the border.  I'm very happy with this project!

Tuesday, February 5, 2013

FO: Crocheted Flower Motif String Bag

I came across this pattern when I was looking for Christmas gift ideas.  I actually made the pink bag for one of my friends, but we've yet to seen each other for the holidays, so I might just end up with it for myself.  The pattern is a really nice pattern (although I found that some of the counts were off).  It's free and quick (took about a week of off and on crocheting) and easy!  I definitely recommend this one.

Pattern: "Crochet Flower Motif String Bag" by LisaJedi Gwinner and it's available as a free Ravelry download.

Yarn: The pink bag is made using Knit Picks Cotlin yarn in Cerise and took about 1.75 skeins.  The green bag is made using Elsebeth Lavold Hempathy in colorway 017 and took about 1.5 balls.  Both I had in my stash--the Cerise from my spring/summer crocheted cardigan and the Hempathy from my I-91 Shop Hop vacation.

Hook size: F, 3.75 mm

Size: The size was as written in the pattern.  My only issue was that I ended up with more loops in the final round than the pattern states.  I think I had 111 or something like that.  Really, it's not a big deal because all you're doing is the top edging and then adding the handles.  This happened both times I made the bag.  To compensate for this difference I just recalculated where to place the handles of the bag.  Easy peasy :).


Notes: The bag holds WAY more than you think it would.  Seriously this bag is awesome!  You can see that I have a few boxes of cereal in the first one and I think some cans and whatever else I had in the kitchen that I could stuff into the bag :).  The green one is now being used as my "stuff carrying bag" for yoga--which is working out really well!  My towel and clothes are all sweaty and gross (eww but AHH) when I'm done with class and the meshiness of this bag allows it to dry really easily.

Friday, October 26, 2012

FO Friday...(sorta)...Pumpkin Pi!

So as you know, I've been working on some little pumpkins as part of my Halloween costume.  Well last night I finished making all 13 of them, in 3 different sizes.  I still need to sew them on my shirt...but I'm just too excited about them and need to reveal my costume before I actually finish it completely.

So,...I love math...and I intern at a company where I do Educational/Psychological/Statistical research.  Apparently everyone is dressing up this year, so I wanted to make something that would go with my math background and statistical themed internship :).  So...I decided to be....PUMPKIN PI! :)


I'm also planning on making some sort of headband with a dollop of "whipped cream" on it, to give my costume that "pie" look.  I'm thinking of using the topping portion of this cupcake by Lion Brand and then attaching it to a plastic headband or hair clip of some sort (maybe like a whipped cream fascinator!).  What do you think?  It's quite punny isn't it?

Oh! And Matt loved my Pumpkin Pi so much, he asked me for one for himself!  So I'm working on that as well.  I unfortunately ran out of the orange yarn 9 pumpkins in to his Pi.  I was using Knit Picks Comfy Worsted in Sweet Potato and that color is discontinued and wouldn't get here in time for Halloween even if I was able to order it.  So I need to see what other kinds of orange yarn I have.  It will work out just fine :).

I'm so excited!

Thursday, October 25, 2012

WIP...Thursday (?): Little Pumpkins!

I have SO many things going on lately--craft related and school related.  It feels as if my head is spinning.  I'm doing my best not to neglect my blog :), but I feel like I have a bunch of posts that I want to write and not adequate time to write them!  I do plan on having 2 more patterns for items I designed a while back published sometime very soon.  In case you're curious, they would be for my crocheted couch caddy and my Snuggly Owl (which I apparently never posted about before...).

But...I'm digressing.  The real reason for this post is to share an ADORABLE pattern that I found for a little pumpkin applique.  I found the pattern on Ravelry and you can find it here.  They are cute and simple and quick--which is EXACTLY what I need for my last minute Halloween costume for work.  I'm not going to reveal my actual costume idea, but I did want to show you these cute little pumpkins!  I've made 3 so far and will be making maybe 10 more, I'll see ;).


Wednesday, October 17, 2012

Owl Cup Cozy

Lately I've been on a mission to try and use up as much of my yarn stash as possible.  I'm really liking the way that this task forces my creativity to flow since I can't just go out and buy the "correct" yarn.  I've been wanting to make myself a reusable coffee cup cozy for some time now, but just never got around to doing it.  If you don't know by now, I'm sort of obsessed with owls....(and purple! especially purple owls...ok, I digress..)...so what better to make as a coffee cozy, but something with an owl on it! To get REALLY creative, I decided to design my own owl, rather than use an existing pattern.  So on Sunday I got my bag of Vanna's choice out and got to work.  The main part of the cozy is a very simple pattern (just single crochets and some crab stitch) and then I made a little owl and sewed him on!

Here's the pattern for what I did...it hasn't been tested, so if there are any errors in it let me know and I'll fix it :).  Also, as always, feel free to use my pattern as you like, but please DO NOT copy my pattern, call it your own, or plagiarize me in any way...it will make me very sad :(...so link to my pattern rather than copying it somewhere.

Happy crocheting!


Owl Cup Cozy
Finished size: Fits around a paper coffee cup.  I used a Starbucks cup as a measure of the cup it fits.

Materials:
Aran or worsted weight yarn.  I used leftovers, so I’m not sure of the exact yardage requirements.  Use up scraps and make it colorful!
Size I and F crochet hooks
Buttons for eyes.
Needle to sew in ends.

Skills needed:
Single crochet
Double crochet
Slip stitch
Crochet in the round and by rows.
Magic ring.

Abbreviations:
CH – chain
SC – single crochet
HDC – half double crochet
DC – double crochet
TR – treble crochet
DTR – double treble crochet
SS – slip stitch
SC2tog – single crochet two together
RSC – reverse single crochet

Instructions:

For the cozy—CH 31 or amount to fit around cup, preferably at the thinner part of the cup.
Round 1: Join as a round and SC in each stitch around join with a SS to the first SC in the round (30 stitches or 1 less than your chain amount).
Round 2: Ch 1, SC in same stitch as SS of last row.  SC around (30 sc).
Repeat for 11 rounds.   For round 12, RSC (aka crab stitch) around.  Break yarn.  Now move to the bottom of the cozy, on the parts of the beginning CH that are visible, RSC around.  Break yarn and sew in ends.

Owl body:
Round 1: Using magic ring, CH2 (does not count as a stitch), 12 DC in ring.  Join with a slip stitch to the top of the first DC, NOT the beginning chain. Pull ring closed.
Round 2:  2 DC in each DC around (24 DC), join with a slip stitch to the first DC in round.
Now begin to work in rows.
Row 1: CH 2, (1 DC in next stitch, 2 DC in next stitch) repeat until the end, 1 DC in last stitch. (10 stitches)
Row 2: Turn, CH1, 2SC in first DC, 1 SC in the next 8 stitches, 2 SC in the last DC.

SS around the entire owl body.  Leave a long tail for sewing to the cozy later.

Owl tummy:
CH 3.
Round 1: SC in 2nd chain from hook and in next chain.  Then 3 more SC in last chain.  Working on the back side of the foundation chain, SC in each chain.  Then 3 SC in other end of the chain. (You’re making an oval.)
Round 2: [You’ll be flowing the same idea as the first round—SC in the “side” stitches and make more stitches at the end.] So, SC in next 3 SCs.  You should be at the 3 SC made at the end of the row in the previous round.  2SC in first stitch, 3SC in end stitch, 2 SC in third stitch.  Then 1 SC in each of the next 4 SCs.  Repeat the end 2-3-2 process at the other end—2 SC in 1st of the 3 stitch group, 3 SC in the next, and 2 SC in the last.  Then SC in remaining stitch.  Join together with a SS and fasten off.

Wing:
CH 8
SC in 2nd chain from hook, HDC in next stitch, DC in next two stitches, TR in next 2 stitches, in last stitch [2 DTR, 1DC, 1SC] fasten off.

Eyes (make 2):
Using magic ring, CHs 2, 7 DC in ring, join to top of the chain. Pull ring closed.  Fasten off.

Beak:
Using smaller hook CH 4.
SC in 2nd chain from hook (3 stitches).
SC2tog then SC in last stitch (2 stitches).
SC2tog (1 stitch).
Fasten off.

Assemble owl before attaching to cup cozy.  Tuck ends in.

Tuesday, October 9, 2012

Bottle Boobies

This weekend I crocheted something that I think might just be the silliest thing I have EVER made.  However, it is fitting that I made it during October, since this is Breast Cancer Awareness Month.  Well, this past week, as I was pouring over the patterns in Ravelry I somehow stumbled on a pattern for a can cozy that was the torso of a woman (sort of) complete with boobs and a bikini top.  Of course I immediately started giggling and sent a photo of it to my boyfriend.  I knew this was right up his ally.  Of course I got a reply about how funny that was.  So I told him I'd make him one if he'd like--his reply was "yes! and make one for Myles (his friend) too!"  

So being the good girlfriend that I am, Sunday I went to Michaels to find some Caucasian flesh colored yarn.  I was torn between a Loops and Threads Incredible color and a Red Heart Super Saver one.  After much deliberation and some in-aisle opinion asking I settled on the RHSS in "buff."  I went home...and got hooky!  About an hour later out popped a bottle cozy with boobs!  Later that evening I made the second :).

Seriously this is the funniest thing I've ever made!  If you want to see them...um...topless, you can click on THIS LINK to view them in my Ravelry project page. :).


Monday, October 8, 2012

Crafting for preemies

This past weekend was the North Jersey Fiber Arts Festival held in Ridgewood, NJ.  This is a yearly event that is now in its fourth year and it brings together crafters of all different fiber arts.  There are knitters and crocheters, hand and wheel spinners, lace makers, sewers, quilters, etc. and it keeps growing every year!  I've visited the festival each year since it began and I must say that it is always a nice time.  

I think my favorite thing about the festival is that each year they have a different charity project that they ask festival goers to donate to, if they have the time.  I actually had not decided if I was going to have the time to make it to this years festival until maybe a week and a half ago.  I decided that I would definitely make the time to get to the festival because I really wanted to donate something to the charity.  

This year the charity they were collecting donations for was Care Wear.  Care Wear is an organization that collects items for preemies and newborns (and I think maybe even older children) and donates them to local hospitals.  They look for hats and blankets as well as kimonos, toys, burial gowns, and other handmade items.  So, to benefit Care Wear, the festival asked for donations of preemie hats and blankets.

Prior to a week and a half ago I had never made an item for a preemie.  Once I started making a few hats I was amazed at how TINY they were.  It totally touched my heart that a baby could be born so small and still be alive--and not just living, but fighting for his or her life!  I knew that I had to make as many items as I could in the weeks time before the festival.  I was able to knit and crochet 7 hats and 3 blankets by the deadline that I set for myself (Saturday morning).  I also had found something in my closet I had made a few years back that was going to be a blanket for myself...but that I fell out of love with...and it seemed the perfect size for a preemie blanket!  I donated that one too.

So in total I gave 11 items! 7 hats and 4 blankets.  I used up yarns from my stash that were really soft and of course washable.  I tried to make the items as pretty as I could.  Starting clockwise below you see a knit square blanket that is striped and made up of left over baby yarns, next is a pink flower blanket (that's what I made years ago and fell out of love with), then a pastel granny stitch blanket with a purple ruffle, and finally a knit square blanket with multicolors, green, and a heart.


I made two different sized pumpkin hats (itty bitty preemie and larger preemie), a teddy bear hat (the ears were just too cute), a pastel colored knit umbilical cord hat, two crocheted hats with little loops on top, and a simply blue and white beanie.  These hat patterns (minus my little embellishment of ears and top loops) are available on the Care Wear website in this lovely 70+ page book of guidelines, patterns, and stories.


I plan on making more items to donate to hospitals.  I really enjoyed doing this.  Each little hat or blanket I made, I stitched with love hoping that it would help a little baby get stronger, healthier, and be able to come home to their families.


Tuesday, September 11, 2012

Sheldons!

I've been a very busy crafter lately, even though I have not been blogging about it. Tsk tsk on me.  One of the patterns that I've just fallen in love with is Sheldon the Turtle from Knitty.  Sheldon is a pretty quick knit and makes an excellent gift.  One of the best things IMO about Sheldon is that you can remove his shell and make him other little outfits to wear instead! How fun is that?  Anywho, I went to my bf's niece's 1st birthday party in August and wanted to bring a little gift for her.  I figured that something hand knit would make a nice gift, so I knit her a Sheldon with a pink and purple shell.  Since this was a gift for her first birthday I embroidered they eyes rather than using safety eyes or buttons.  It's totally child friendly!  It was really cute when she opened her present because she gave Sheldon a big kiss! :)


So...Sheldon is *such* a great pattern that I decided to make another one as part of a gift for my cousins' who are expecting their first baby.  This one took even less time to make.  I really love making the shell!  They expecting a baby boy sometime in September (I think).  I'm also making them a baby blanket and I picked colors for Sheldon that match the blanket.  I've also embroidered the eyes to make it totally safe for a baby.


I also really love that I've used yarn that I've had in my stash for both Sheldons!  I love making use of things :).

Monday, September 10, 2012

Are you ready for some football?

It's that time of year again, football season!  Now, I have to be honest...I'm not much of a football fan, but I don't mind watching games (in fact, sometimes I really enjoy it!).  My bf, however, is quite the football fan.  He LOVES his Giants!  So what better to make for him than a football hat?  He was so happy with the hat :).


I also recently met his 11 yr old nephew, B, and when I met B he asked me to make him a dog (because I made his sister a Sheldon the turtle)...well I was told that he's too old for a stuffed dog (which I'm not sure if I agree with).  I don't want to ruffle any feathers, so I knit him a football hat too (and I'll probably knit the dog later :)).  B's hat is a surprise and I haven't given it to him yet.  Hopefully he'll like it!

Thursday, June 28, 2012

FO: Bedroom pillows

This spring I decided to get a new quilt for my bed because I was tired of the other one that I had. I ended up finding *THE PERFECT* one at Kohl's.  Purple and gray with leaves and vines stitched along in.  I fell in absolute love with it!  However Kohl's did not have any shams to go with it, except for the European kind which I didn't want.  So I was left with a bit of a problem....how do I make my bed without shams?  I decided to buy the quilt anyway.  My friend Matt was with me when I found it and he liked it a lot too!  After purchasing it we went to 2 or 3 different stores to try and find shams to go along with it, but had no luck.  We took it home and put it on my bed.  After thinking about it for a while, I realized that I had pillows on my couch that would match the quilt and easily let me bring in other colors to match it!  However, I felt that these pillows (the two butterfly ones and the paisley one) didn't quite "finish off" my bed.  Soooooo I decided to crochet myself two more pillows to go along with them.  I decided that these pillows would tie in the green, blue and cream in the butterfly pillows with the green, blue, cream, and purple in the paisley pillow.  I used a pattern from a Sarah London book (it's really just a granny square) and use the remaining yarn from my "bring-it-on baby blanket."  I was actually surprised at how much yarn these pillows used up!  Not only did they take up 4+ skeins of Naturally Caron Country, but they also took one skein of Naturally Caron Spa and some Simply soft that I had that matched.  I'm really happy that I got to use up stash to make these...and I love the look of my bed!  Next up is to make a matching throw.....I've already the yarn from Knit Picks (Comfy Sport!!!)....mwah-ha-ha ::evil yarn lover laugh:: ;).


Wednesday, June 27, 2012

FO: Bring it on Blanket!

Back in March I finished knitting this blanket.  It was the first blanket that I've knit.  Originally it was intended to be a gift for one of my friend's new baby, but I completely fell in love with it and love love love how it looks in my living room.  So...selfishly....I kept it for myself.  Shhh, don't tell!  The pattern is from Pickles and called the Bring-it-on baby blanket.  The awesome thing about this pattern is that it is knit on larger needles, so it goes pretty quickly, and the lace pattern is beautiful!  I used some Naturally Caron Country yarn from my stash.  (It always feels nice to use up stash!  That's one of my goals for 2012....) I had blue, purple, green, and white yarn (all of my favorite colors).  This blanket is so soft and stretchy.  It is the perfect size for a lap blanket and I've been getting a lot of use out of it when I watch TV!  This is a pattern that I highly recommend!  If you decide to make it, I'd suggest using a yarn that can be blocked so that the laciness can really open up nicely.


Sunday, June 17, 2012

Dish towels!

In an attempt to decrease the amount of yarn that I have stashed (aka "destash") I'm trying to find little projects to knit and crochet (quickly) that will be useful and help me use up my yarn. (So I can ultimately get more..shhhh).  Well, I found a wonderful pattern to make dish towels!  At my mom's house we always had a towel hanging on the fridge.  Sort of a "clean hands only" towel to use rather than always drying your hands with a paper towel.  Usually these were an actual towel that had a crocheted top section to allow it to be buttoned around the fridge handle.  I've tried knitting a towel like this before, but the pattern I picked was mostly stockinette stitch which ended up curling when it was on the fridge and it didn't seem absorbent or soft etc.  So recently I came across this pattern.  Funny enough, my mom noticed the first (curling) towel I had knit and fell in love with the idea of it.  So, I decided to knit her one using the new pattern that I found.

This is the result:

I used some cream colored yarn that I had and a sage green colored yarn to accent it with (it looks a bit darker in the picture than it is in person).  My mom's kitchen has both colors in it, so I figured it would go nicely and if she really hated it, it also matches my kitchen.  Well, she loved it!  It is very soft, does not roll, and is absorbent!  Sooooo, I decided to knit one for myself as well :).


There are definitely more of these planned in my future! I think a set of these would make a nice addition to a house warming gift!

Obsessed!

For the past week I've become sort of obsessed with a pattern for a crocheted bag.  Yep, a crocheted bag.  The pattern is from Purl Soho and published in the Purl Bee blog.  You can find the pattern here.  This bag/basket is GENIUS!  It has a marvelous construction and is amazingly stretchy.  I seriously cannot believe how much stuff I can fit into one basket!  I have visions of storing all sorts of things in these baskets!  Watch out friends, I bet you'll be getting these for gifts! :)

Here are two I've made this past week.  I used up some of my Red Heart Super Saver stash that I had around.  They take about a skein and a half to make the entire bag and can be made in a day, I imagine.

So here is the first bag that started the obsession.  I put a bunch of different yarn that I had in random bags in my bedroom into it.  


I just cannot believe how much I could fit into that bag!  8 skeins of Vanna's colors, 6 skeins of Cotlin, 4 skeins of Felici sport, 2 skeins of Felici fingering, and 1 skein of Chroma worsted...and I'm sure I could have fit more!


I really liked how the colors flowed into this bag.  I'm usually not a fan of crocheting with variegated yarn, but this just really worked for me!  Also, the beauty in this pattern (if you're using variegated yarn) is that you cannot see where the yarn change was made.  The pattern doesn't really allow for a uniform pooling of colors, which is great for using up multiple skeins!


Here is the second one.  There is definitely room in this bag for more! I think I have over 26 skeins of comfy sport in it and I know it can take more!


I seriously love love love these bags!!! :)