Search This Blog

Showing posts with label knitting. Show all posts

Saturday, April 26, 2014

Christmas Stockings!

I love holiday crafting.  Like LOVE love it.  There is the excitement of picking the *perfect* pattern with the *perfect* yarn.  I also love that I'm working towards a goal--need to get it all done before Christmas!  But then...bam...it hits.  That mad rush to finish the holiday items!  Because not only do I end up with things I want to make for gifts, but I also go into super Craftini mode for items for my Etsy store.  This year I decided things will be different.  All summer I'll be working to stock my store and will have new rules for custom holiday items.

What would be the biggest help for a Craftini like me?  Getting custom requests in early.  Like months early.  Custom items take time to make.  I put my entire heart and soul into what I make--so when you get a Craftini Marini item it is always made with love and with the best craftsmanship!  So, I was thrilled when I got a custom order in January for a holiday item!  It was an order for four Christmas stockings and I had a BLAST working with this client.  She wanted stockings for herself, her husband, and their two cats--the best part was that I got to match the cats' stockings to their fur color!


She wanted something fun and stripey for herself.  I worked with two different greens, two different reds, and white to create this fun, whimsical stocking!


For her husband she wanted something that looked like a candy cane with a green toe and heel.  I used the darker green and red from her stocking for his so that they would coordinate.  Love the way this came out!


 And for the cats she wanted a chevron pattern using each of their fur colors (silver gray and black) with white.  I LOVE the way these came out.


This was such a fun project!  These were actually my first time knitting Christmas stockings and my first time doing stranded color work.  I know that there will be more of these in my future!  Keep and eye out on my Etsy shop to see if any show up there for the holidays!

Monday, April 21, 2014

Strawberries and cream baby sweater

You know what I love?  Well, ONE of the many things I love, that is.  I love crafting for babies.  There is something so sweet and special when you make something for a little baby.  I try to do it as frequently as I can!

One of my most recent items is a striped sweater in cream and light pink.  The pink is heathered and I'm just so in love with how it pairs with the cream.  I added pink buttons that add the perfect "girly" touch to this sweater.  I definitely need to clarify something--I don't like to genderize (is that even a word) items for babies.  I don't believe that colors are gender specific and that girls should wear only pink and purple and boys only green and blue.  However, this sweater began as a special request by my mom for a friend and since my mom is more traditional that I am, she wanted something pink for the little girl.  So this sweater was born :).

But, to be honest, I do LOVE the way it came out!  Also, plans changed and the sweater is no longer going to the intended recipient, so look for it in my Etsy store in the fall! (If I don't gift it before then!)


Friday, August 2, 2013

Columbia cup cozies

So, as you all know, I successfully defended my dissertation and received my PhD this past semester.  It is sort of customary to give a gift to your advisor and dissertation committee as a thank you for taking the time to read your dissertation, provide a thorough examination of your ideas and work, and give you constructive feedback on your research.  I decided to give each member of my committee, my advisor included, a coffee cup cozy and a gift certificate.  I use a wonderfully simple pattern for the cozies.  Columbia colors are light blue and white, so I made the base of the cozy light blue and added a duplicate stitch "C" in white.  I was really pleased with how they came out and my committee loved them.


Saturday, July 27, 2013

Yoga mat bags

If you don't know this about me already, you need to know that I love yoga.  Everything about yoga--the message, the spirit, the teachings, the poses, and the way that it is part of everything in life.  My love of yoga ties with my love for yarn (now that's saying something, isn't it?).  As you know Matt just completed his yoga teacher training and he has been teaching me a lot about yoga and its foundations.  He specifically has been teaching me about Raja yoga and its 8 limbs.  I have been trying to abide by the yamas (the first limb that represents the social code) and the niyamas (the second limb that have to do with the 'self').  One of the yamas is Aparigraha which says that one should not hoard things and should be non possessive.  I do have a problem with this sometimes (evidenced by my growing yarn stash).  So I have been trying to work on this in various ways.  I've been gathering items to donate, trying to get rid of items that are unnecessary to me, and also trying to destash when possible.  I am definitely not an expert on the yamas or how to live by them, but I am trying my best.

So what does this all have to do with knitting and crocheting?  Well, I have been making yoga mat bags with my stash.  I am planning on "selling" them at my yoga studio very soon.  The yoga studio has a boutique and it would be a perfect place to sell these items.  So far I have made 4 different bags and have at least one more planned before I'm going to bring them to the studio.  I've used a bag for my yoga mat that I knit back in 2011 and I'm ALWAYS getting complemented about it.  I really like it--it is machine washable and dry-able and is perfect for quickly stashing a sweaty yoga mat.  However, there were things that I could improve on--the strap was too long and the drawstring tie would come untied or be a bit of a pain to tie.  So I improved on these things with the new bags I made.

Here are the first two I've made for the studio.  The purple one is crocheted out of cotton in a ripple pattern.  You can see how they feature a shorter strap and a drawstring that cinches closed when you pick up the bag.  That's my favorite part :).  The second one is knit out of acrylic and also features the same shorter strap and cinching drawstring!

I have two others--one that looks like a tree and a blue lacy one that I developed the pattern for.  I'll post those in another entry when I get some decent photos of them.  I'll also be posting the pattern for my lacy mat bag--so keep an eye on my blog for that :).


Monday, July 8, 2013

Om hand warmers

Matt (my best friend) just finished his 200-hour yoga teacher training at the beginning of June.  So, being the crafty friend I am, decided to make him a yoga-themed gift.  Using my knowledge of his love for hand warmers and all things Om-related I set off to make him the perfect gift.  And...the Om hand warmers were born!

He absolutely loved them and can't wait for it to get a bit cooler to wear them.  (I'm also hoping to do a photo shoot with him to get some swanky yoga-riffic photos!)

Since he loved them so much, I really wanted to share the love and share my pattern and Om chart with you!  So without further ado, here is the recipe for my Om hand warmers!  Enjoy!

As always, feel free to sell items you make from my patterns, but please do not claim this pattern as your own, post any parts of it or the whole thing in other locations, or sell the pattern. :)

Gauge: roughly 7 rows = 1 inch; 7 stitches = 1 inch on size 7 needles.  The Om chart is 20 stitches by 17 rows and this measured 3 inches (stitches) by 2.5 inches (rows).
Needles: US size 7 and US size 9 or size need to obtain gauge
Yarn: Aran or Worsted weight

You can use any yarn and needle combination that you like.  If you use thinner yarn, increase the cast on stitches by 2 until you have enough to fit nicely around your palm, above your thumb.  These mitts are meant to be fitted to the hand--so if you'd like them looser, increase your cast on.

This hasn't be tested by others, so please let me know if you find any errors!

Mitt Instructions


Cast on 34 on 9s.
Switch to size 7s on the first round of knitting.
Join in the round, place marker for the beginning of the round.
Rounds 1-12: K1P1 ribbing
Rounds 13-24: Knit

This should get you to up to the base of your thumb or slightly higher.  You'll now begin to work back and forth in rounds.  DO NOT JOIN the next 13 rows.  You're creating the thumb opening.


Rows 25-37: Alternate a knit row and a purl row, continuing in stockinette stitch but in rows, ending with a knit row.  You can slip the first stitch of each row to create a nice edge if you'd like.

In more detail:
Rows 25, 27, 29, 31, 33, 35, and 37: Knit
Rows 26, 28, 30, 32, 34, and 36: Purl

[This section leave the hole for your thumb.  If you have a smaller or larger thumb (or different row gauge) adjust the number of rows--adjust by increments of 2 rows.]

After Row 37 join to the beginning of the round and start knitting again in rounds.


Rounds 38-47: Knit (this is 10 rounds in stockinette stitch)
Rounds 48-51: K1P1 ribbing


BO in pattern using size 9 needles, or stretchy bind-off of your choosing.

Repeat for the second mitt.

Adding the Om on the front of the mitts
Us the following chart to duplicate stitch the Om on the front of the mitt.  Remember that you'll need at least 20 stitches by 17 rows to complete the chart.  Try the mitt on first before stitching.  I found it worked nicely to have the side of the Om closest to the thumb opening begin about 2 or 3 stitches inside.

I'd love to see your finished hand warmers!

Sunday, February 10, 2013

FO: Baby Bibs

You'll see in the coming posts that I've been busy making a bunch of baby items.  It seems as if a lot of my friends have been asking me to make them stuff or having babies!  Here is one of my favorite patterns for a handmade bib.

Pattern: "I-Love-Stockinette Baby Bib" by Laura Treadway which is available as a free Ravelry download.

Yarn: Lion Brand Cotton-Ease in plum and berry.

Needle size: US 7

Size: As written, no modifications.

Notes: I really enjoyed using cotton-ease for these bibs.  I love the way that they turned out.  The drape is nice and they really don't curl that much.  I've used Knit Picks comfy worsted before, but I've found that they really curled a lot.  Also, I did not slip any edge stitches on these bibs and I think that might have helped them to not curl? Just a thought.


Sunday, February 3, 2013

FO: Dallas Cowboys Football Hat

One of my friends saw the football hats that I made last year and asked me if I would be able to make her daughter a Dallas Cowboys themed football hat.  Here's what I came up with.

Pattern: "Football Hat"by Brenda K. B. Anderson available in the 8th issue (December 2011/January 2012) of Knitting Today! (aka Your Knitting Life).

Yarn: I actually had trouble finding yarn that seemed to suit the Dallas Cowboys colors.  My friend said that it would be ok if I had to use navy, so that's ultimately what I ended up with.  A lot of the blues were too bright and a lot of navys were too dark.  I ended up using Loops and Threads Impeccable in Navy and Vanna's choice in Silver Heather.

Needle size: US 7's for the ribbing and US 8's for the rest.

Size: Adult size with my usual modifications--2 extra rows on the ribbing (done in K2,P2) and two extra rows on the top stripe before and after the decreases.

Notes: My friend's daughter wanted braided tails, so I cut twice as many lengths of navy as of silver and threaded them through the bottom of the ear flap and then braided them.  I was braiding with two navy sections and one silver.  I'm very happy with the final product as is my friend! I hope her daughter likes it just as much.  This is a great pattern to make (I've made 4 of them so far).  My only issues are that the ear flaps curl, they are thin, and the laces detail is a bit of a pain to sew on.  Other than that, I totally recommend it!


Happy Super Bowl!

Sunday, December 16, 2012

Thermal Tweed Scarf

Maybe it is just me, but I have trouble finding scarves that look "manly."  When I make something for a guy I'm always worried that he isn't going to like it or maybe he will find it too feminine.  (I'm not one for gender labeling, but you never know how a recipient of a gift will feel.)  Well, I think that I found a nice manly/gender neutral scarf.

I present to you, the knit Thermal Tweed Scarf.


Supplies:
3 skeins of Vanna's choice tweed yarn
Size 9 and 10.5 knitting needles
Gauge: 16 stitches = 4 inches in stockinette stitch (on size 9 needles or whatever size gives you gauge)
yarn needle for weaving in ends.

Instructions:
Cast on 31 stitches using the larger needles then switch to smaller needles to knit the scarf.  (If you'd like a wider or skinnier scarf just make sure that the cast on number of stitches is an odd number.)

Just as a note, the first and last stitch will make the border of the scarf.

Row 1: K1, *K1, P1*, repeat * to * until 1 stitch before end, K1.
Row 2: K1, *P1, K1* , repeat * to * until the end.
Row 3: K all stitches
Row 4: K all stitches.

Repeat this pattern until about a half inch from desired length.  A good idea of the "proper" scarf length is the height of the person wearing it or just a tiny bit shorter.  This will allow it to be wrapped around the neck or halved and then slipped through.

Once you reach this length, repeat Row 1 and Row 2 and then bind off knit wise using the larger needle.

Weave in ends and enjoy!


Here is a close up of the detail of the pattern and how it looks in the tweed yarn.  Nice and textured, but still simple and clean looking!

Tuesday, November 13, 2012

Baby Theta Hat

As you might know, I am a PhD student.  My field of study is measurement, evaluation, and statistics which are all parts of educational measurement and psychometrics.  Now I'm about to get a little bit technical, but hang in there :).  Psychometrics is the study of test development and psychological measurement.  We study how to measure things like knowledge, abilities, and personality traits--which are all things that you can't see or observed and are also called latent traits or variables.  In one type of analysis called item response theory (IRT) ability is estimated by responses on a test.  This ability is represented by the variable theta.  When you estimate a theta, this estimated variable is called "theta hat."

Ok, here is where the knitting part comes in! Are you still with me :).  Well, a few weeks ago I got this funny idea to make my friends' son a theta hat!  This is the little boy that I made the football hat for :).  His dad, Brian, is also in my PhD program and he works at the company where I intern.  I just knew that Brian would get such a kick out of his son wearing a "theta hat!"  Sooooo I decided to make my own theta hat pattern! Annnnnd...without further ado, I present to you my pattern for a Baby Theta Hat.

Feel free to sell any items made from this pattern, just please do not sell this pattern itself.  Also, if you find any corrections, please let me know! :)


Baby Theta Hat

Size: 0 – 12 months (approximately)
Finished dimensions: Height = 5.5 inches (not including pompom).  Relaxed circumference of about 15.5 inches, but stretches to over 20 inches.  
Gauge: 18 stitches by 24 rows = 4in on size 8 needles.

Material: 
Aran or Worsted weight yarn in a main color and a contrasting color.
Size 8 circular needles—either 1 long circular for magic loops, 2 circulars, or dpns—or sized needed to achieve gauge.
Size H crochet hook
stitch marker
needle to sew in ends

Skills needed: 
Knit stitch
purl stitch
knit two together (k2tog)
knitting in the round
Surface slip stitch crochet. (You can find some good tutorials online).

Abbreviations:
CO – Cast on
K – knit
P – Purl
K2tog – knit two together

Instructions:
Using larger needles and main color yarn CO 60 stitches, place marker, and join in the round.  

Round 1: K1, P1 around.
Round 2: P1, K1 around.

Repeat Rounds 1 and 2 for 1 inch.

Next round: K all stitches around (60 stitches).

Repeat this round (aka K all stitches around) until piece measures about 3.75 inches from the beginning.

Crown shaping:
Round 1: (K8, k2tog) repeat this around (54 stitches).
Round 2: K all stitches (54 stitches).
Round 3: (K7, k2tog) repeat this around (48 stitches).
Round 4: K all stitches (48 stitches).
Round 5: (K6, k2tog) repeat this around (42 stitches).
Round 6: K all stitches (42 stitches).
Round 7: (K5, k2tog) repeat this around (36 stitches).
Round 8: K all stitches (36 stitches).
Round 9: (K4, k2tog) repeat this around (30 stitches).
Round 10: K all stitches (30 stitches).
Round 11: (K3, k2tog) repeat this around (24 stitches).
Round 12: K all stitches (24 stitches).
Round 13: (K2, k2tog) repeat this around (18 stitches).
Round 14: K all stitches (18 stitches).

Cut yarn and leave a long tail.  Thread the tail through all of the stitches on the needle, pull tightly, tie securely, and tuck ends in on the reverse side.

Theta detail on hat:
Using contrasting color yarn yarn, tie a slipknot in the yarn and place yarn inside the hat (right side of hat is facing you).  Decide on placement of theta on the hat and begin surface slip stitch crocheting the theta.

Secure ends when you’re done by weaving them into the reverse side of the contrasting color stitches only.  I’ve found that they tend to show if worked into the main color.


Make pompom:
Using both the main color and contrasting color yarn.  Wrap both strands around 3-4 fingers on your hand a bunch of times (maybe 15).  Cut a long piece of the main color yarn and wrap around the bundle of yarn that is on your fingers.  Slip the bundle off your fingers.  Tie a knot in the middle of this bundle with the main color yarn.  Make sure this knot is very tight.  Begin cutting all of the loops of yarn.  Once all of the loops are cut, give the pompom a trim into a nice round shape.  Align the pompom to the top of the hat and thread the long tails of the main color into the inside of the hat at the top.  Tie a knot inside the hat and secure the ends. 


Sunday, October 14, 2012

Baby Football Hat

One of my friends at school/work asked me to make his 3 month old son a football hat.  He told me that his wife really liked the other two I made and is a big football fan.  I didn't see a pattern online that I liked, so I decided to make my own.  I think this will fit a baby up to 12 months because it is quite stretchy.


Baby Football Hat

Size: 0 – 12 months 
Finished dimensions: Height = 6 inches.  Relaxed circumference of about 13 inches, but stretches to over 16 inches.  
Gauge: 18 stitches by 24 rows = 4in on size 8 needles.

Material: 
Aran or Worsted weight yarn in brown and white.
Size 7 and 8 circular needles—either 1 long circular for magic loop, 2 circulars, or dpns—or sized needed to achieve gauge.
Size F crochet hook
stitch marker
needle to sew in ends

Skills needed: 
Knit stitch
purl stitch
knit two together (k2tog)
color changing
knitting in the round
Surface slip stitch crochet. (You can find some good tutorials online).

Abbreviations:
CO – Cast on
K – knit
P – Purl
K2tog – knit two together

Instructions:
Using larger needles and white yarn CO 60 stitches, place marker, and join in the round.  

Switch to smaller needles.

Rounds 1-6: K2, P2 around (60 stitches).

At end of 6th round cut white and leave a tail.  Join brown yarn.  Switch to larger needles.

Round 7:  K all stitches around (60 stitches).

Repeat row 7 until piece measures about 3.5 inches from the beginning.

Switch back to white yarn.

Next 2 rounds: K all stitches around (60 stitches).

Crown shaping:
Round 1: (K8, k2tog) repeat this around (54 stitches).
Round 2: K all stitches (54 stitches).
Round 3: (K7, k2tog) repeat this around (48 stitches).
Round 4: K all stitches (48 stitches).

Switch to brown yarn.

Round 5: (K6, k2tog) repeat this around (42 stitches).
Round 6: K all stitches (42 stitches).
Round 7: (K5, k2tog) repeat this around (36 stitches).
Round 8: K all stitches (36 stitches).
Round 9: (K4, k2tog) repeat this around (30 stitches).
Round 10: K all stitches (30 stitches).
Round 11: (K3, k2tog) repeat this around (24 stitches).
Round 12: K all stitches (24 stitches).
Round 13: (K2, k2tog) repeat this around (18 stitches).
Round 14: K all stitches (18 stitches).

Cut yarn and leave a long tail.  Thread the tail through all of the stitches on the needle, pull tightly, tie securely, and tuck ends in on the reverse side.

Lace detail on hat:
Using white yarn, tie a slipknot in the yarn and place yarn inside the hat (right side of hat is facing you).  
Two brown rows up from the ribbing begin surface slip stitch crochet and slip stitch until you’re two rows of brown away from the white stripe. 
Cut a white leaving a VERY long tail, and pull the last loop of white out towards you.  
Thread needle and bring the tail back inside the hat so that the working yarn is now on the wrong side. 
Working about 2 stitches away from the slip stitched line bring yarn up to outside of the hat, under the slip stitch in that row, and down inside the hat two stitches away from the slip stitched line.  This makes one of the laces.  Repeat this as many times as you’d like, equally spacing the laces.
Secure end when you’re done.
Tuck in all ends on inside of the hat.


Monday, October 8, 2012

Blocking makes all the difference...

Remember my Summer Vest? After I wrote my FO post about the vest I decided to see if I could block the vest to make it stop rolling and give it more flow.  I used wet blocking and stretched it out on a big beach towel using my blocking wires.  It surprisingly dried over night :).


And the result?  PERFECT!!


Crafting for preemies

This past weekend was the North Jersey Fiber Arts Festival held in Ridgewood, NJ.  This is a yearly event that is now in its fourth year and it brings together crafters of all different fiber arts.  There are knitters and crocheters, hand and wheel spinners, lace makers, sewers, quilters, etc. and it keeps growing every year!  I've visited the festival each year since it began and I must say that it is always a nice time.  

I think my favorite thing about the festival is that each year they have a different charity project that they ask festival goers to donate to, if they have the time.  I actually had not decided if I was going to have the time to make it to this years festival until maybe a week and a half ago.  I decided that I would definitely make the time to get to the festival because I really wanted to donate something to the charity.  

This year the charity they were collecting donations for was Care Wear.  Care Wear is an organization that collects items for preemies and newborns (and I think maybe even older children) and donates them to local hospitals.  They look for hats and blankets as well as kimonos, toys, burial gowns, and other handmade items.  So, to benefit Care Wear, the festival asked for donations of preemie hats and blankets.

Prior to a week and a half ago I had never made an item for a preemie.  Once I started making a few hats I was amazed at how TINY they were.  It totally touched my heart that a baby could be born so small and still be alive--and not just living, but fighting for his or her life!  I knew that I had to make as many items as I could in the weeks time before the festival.  I was able to knit and crochet 7 hats and 3 blankets by the deadline that I set for myself (Saturday morning).  I also had found something in my closet I had made a few years back that was going to be a blanket for myself...but that I fell out of love with...and it seemed the perfect size for a preemie blanket!  I donated that one too.

So in total I gave 11 items! 7 hats and 4 blankets.  I used up yarns from my stash that were really soft and of course washable.  I tried to make the items as pretty as I could.  Starting clockwise below you see a knit square blanket that is striped and made up of left over baby yarns, next is a pink flower blanket (that's what I made years ago and fell out of love with), then a pastel granny stitch blanket with a purple ruffle, and finally a knit square blanket with multicolors, green, and a heart.


I made two different sized pumpkin hats (itty bitty preemie and larger preemie), a teddy bear hat (the ears were just too cute), a pastel colored knit umbilical cord hat, two crocheted hats with little loops on top, and a simply blue and white beanie.  These hat patterns (minus my little embellishment of ears and top loops) are available on the Care Wear website in this lovely 70+ page book of guidelines, patterns, and stories.


I plan on making more items to donate to hospitals.  I really enjoyed doing this.  Each little hat or blanket I made, I stitched with love hoping that it would help a little baby get stronger, healthier, and be able to come home to their families.


Friday, September 14, 2012

Matt's Yoga Mat Bag!

Back in July I introduced my best friend to hot yoga...and of course he loved it! (Seriously it is addicting...if you haven't tried it yet, I really encourage you to go take a class.)  After his first class he was so excited about yoga!  I had made myself a bag for my mat a while back.  Matt asked me if I could make him one as well in blue.  So I searched my stash and I found some organic cotton by Patons and got knitting!

Here's the finished product.  I made his strap shorter than the one I made for myself and also a bit wider since it will stretch due to the weight of the bag.


Just for reference...this WIP picture shows the color most accurately :).


Wednesday, September 12, 2012

WIP Wednesday: Staggered Squares Blanket

One of my works in progress, as there are many at the moment, is the Staggered Squares Blanket.  This is the second part of the gift I'm giving to my cousins who are expecting their first baby.  The other part is the orange-and-blue shelled Sheldon the Turtle.  


I usually crochet baby blankets, but I fell in love with this pattern.  I believe it is a Bernat patter that I got free from Michaels.  The yarn I'm using is something that I had in my stash.  It's an acrylic sport weight yarn that is VERY soft.  I was hesitant about using the lacy pattern with this yarn (even though this is one of the yarns that is recommended for this pattern) because I thought that the pattern might get lost among the colors of the yarn.  The larger it gets, the more I like it.  I'm knitting it on US 8s, which is making it go a bit faster than I anticipated.  I can do about 1 pattern repeat (16 rows) during my daily commute (8 rows each way).  I should have this blanket finished by the end of the month if I can keep this pace or make it a bit faster.


I also think that I would make this pattern again because it's fun to do!  I would also probably use a yarn that I could block--perhaps one of the sock yarns from Knit Picks.  I am really happy with this blanket--it is soft and light weight--perfect for this soon-to-come baby!

Tuesday, September 11, 2012

Sheldons!

I've been a very busy crafter lately, even though I have not been blogging about it. Tsk tsk on me.  One of the patterns that I've just fallen in love with is Sheldon the Turtle from Knitty.  Sheldon is a pretty quick knit and makes an excellent gift.  One of the best things IMO about Sheldon is that you can remove his shell and make him other little outfits to wear instead! How fun is that?  Anywho, I went to my bf's niece's 1st birthday party in August and wanted to bring a little gift for her.  I figured that something hand knit would make a nice gift, so I knit her a Sheldon with a pink and purple shell.  Since this was a gift for her first birthday I embroidered they eyes rather than using safety eyes or buttons.  It's totally child friendly!  It was really cute when she opened her present because she gave Sheldon a big kiss! :)


So...Sheldon is *such* a great pattern that I decided to make another one as part of a gift for my cousins' who are expecting their first baby.  This one took even less time to make.  I really love making the shell!  They expecting a baby boy sometime in September (I think).  I'm also making them a baby blanket and I picked colors for Sheldon that match the blanket.  I've also embroidered the eyes to make it totally safe for a baby.


I also really love that I've used yarn that I've had in my stash for both Sheldons!  I love making use of things :).

Monday, September 10, 2012

Are you ready for some football?

It's that time of year again, football season!  Now, I have to be honest...I'm not much of a football fan, but I don't mind watching games (in fact, sometimes I really enjoy it!).  My bf, however, is quite the football fan.  He LOVES his Giants!  So what better to make for him than a football hat?  He was so happy with the hat :).


I also recently met his 11 yr old nephew, B, and when I met B he asked me to make him a dog (because I made his sister a Sheldon the turtle)...well I was told that he's too old for a stuffed dog (which I'm not sure if I agree with).  I don't want to ruffle any feathers, so I knit him a football hat too (and I'll probably knit the dog later :)).  B's hat is a surprise and I haven't given it to him yet.  Hopefully he'll like it!

Monday, August 6, 2012

FO: Summer Vest

In the middle of July I knit myself a summer vest in an orange color.  I'm super happy with the way it turned out.  These photos are pre-blocking, but after it was blocked it REALLY opened up and no longer rolls (and is much more flowy).


Saturday, August 4, 2012

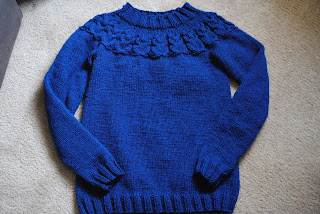
Ta-DA!!!!! Owls is done!

So the Ravellenic Games have been going on since the start of the Olympic Games.  Like I said in a previous post I was going to knit myself the Owls sweater.  Well....last night I finished it!!! I actually knit myself a sweater in just over a week!!! I'm SO very excited and proud of myself!!


Wednesday, July 18, 2012

A post without pictures...

...is not that much fun.  I have been a little absent from the blogosphere lately, so I feel the need to post an update.  Let's see...my last post was about my crocheted summer sweater which was a WIP at the time...now it's a FO! I ended up finishing that sweater on July 8th, but I've yet to take proper pictures of it.  In fact, that is actually the theme of this post...the lack of proper pictures.  I crocheted a set of lotus earrings in a deep purple the other night...but I still need to weave in the ends and take a picture or two.  (Although I think they sort of get lost in my hair because of the color...but I'll see.  They were quick and easy to make, so perhaps I'll whip up another pair soon.)  I'm also working on a summer style vest for myself in sort of a burnt orange color (pictures to come...:)).  I've also been invited to my boyfriend's niece's 1st birthday party this August.  I've decided to make her a Sheldon with a green body and a pink and purple shell.  So far I've the body and legs all finished and just need to make the shell.  This is such a cute turtle!  Annnnnnd I'm knitting a yoga mat bag for Matt!  He joined me at hot yoga on Monday and fell in love with it--it is awesomely wonderful and addicting!  So of course he needs a nice knitted yoga mat bag to hold his new mat! :) (It's blue and in organic cotton...pictures to come :)). 

Finally, back on 6/25 I had finished the ruched tee that I had started the year before (during the interim of the CPH KAL).  It took me so long to finish it because I kept getting distracted with other project.  Well, I wore the tee for the first time on 7/2. I got so many compliments on it!  The only complaint I have is that it grew a I wore it.  Meaning it is now sort of tunic length!  Also the back is a bit saggy and baggy, which I'm not the biggest fan of.  I think that I'm going to crochet a round around the neckline to try and strengthen it up.  I've also read about slip stitch crocheting on the inside of a knitted garment to give it more strength and structure.  I think that I might do this on the ruched sections.  They sort of got less..um...ruchy as the day went on.  So, hopefully that will improve it a bit.  After I do all of that, I plan on washing it in warm to hot water and throwing it in the dryer on a hot setting, in an attempt to shrink it some.  The yarn is 60% cotton 40% modal, so hopefully the cotton part will shrink when I do this.  If not, I'll make it work as a tunic over leggings or skinny jeans.  I'm definitely not frogging this project!  I love the yarn and the look of it on me...I'm just not a fan of the sag.

I guess that's it for now.  I promise to post some pictures of all of these projects! I need to either set up my tripod or get a friend's help to take a picture of me in the sweaters I made!

Oooo and the Ravellenic Games are starting next week!! Hurray!!

Wednesday, June 27, 2012

FO: Bring it on Blanket!

Back in March I finished knitting this blanket.  It was the first blanket that I've knit.  Originally it was intended to be a gift for one of my friend's new baby, but I completely fell in love with it and love love love how it looks in my living room.  So...selfishly....I kept it for myself.  Shhh, don't tell!  The pattern is from Pickles and called the Bring-it-on baby blanket.  The awesome thing about this pattern is that it is knit on larger needles, so it goes pretty quickly, and the lace pattern is beautiful!  I used some Naturally Caron Country yarn from my stash.  (It always feels nice to use up stash!  That's one of my goals for 2012....) I had blue, purple, green, and white yarn (all of my favorite colors).  This blanket is so soft and stretchy.  It is the perfect size for a lap blanket and I've been getting a lot of use out of it when I watch TV!  This is a pattern that I highly recommend!  If you decide to make it, I'd suggest using a yarn that can be blocked so that the laciness can really open up nicely.