I've been really into making items for babies lately. I think that I've been drawn to small projects that I can work on during my lunch break. I also have been loving projects that finish quickly, use up bits of yarn, and are simply "totally adorable."
Recently I finished making a sweet little pinafore. I used some yarn that my mom got me from Jo-ann's. It's called "Breeze Self Patterning" by Jo-ann's Sensations. It has nice long color changes that created a pretty rainbow look to this dress.
This dress seems very easy to customize to make larger sizes. In fact, I saw a pattern for larger sizes on Etsy and Bernat also has a free pattern for child-size dresses. They all look like the same dress, but in different sizes. Honestly, just change your initial chain length and it should be pretty easy to customize. I think that you would add or subtract multiples of 4 to get larger or smaller sizes.
Some people on Ravelry have added a decoration to the front of the dress, but I left mine plain since the yarn is sort of busy. I'll definitely be making this pattern again! It could definitely be made in a few hours. Great last minute baby gift!
Thursday, July 11, 2013
Monday, July 8, 2013
Om hand warmers
Matt (my best friend) just finished his 200-hour yoga teacher training at the beginning of June. So, being the crafty friend I am, decided to make him a yoga-themed gift. Using my knowledge of his love for hand warmers and all things Om-related I set off to make him the perfect gift. And...the Om hand warmers were born!
He absolutely loved them and can't wait for it to get a bit cooler to wear them. (I'm also hoping to do a photo shoot with him to get some swanky yoga-riffic photos!)
Since he loved them so much, I really wanted to share the love and share my pattern and Om chart with you! So without further ado, here is the recipe for my Om hand warmers! Enjoy!
As always, feel free to sell items you make from my patterns, but please do not claim this pattern as your own, post any parts of it or the whole thing in other locations, or sell the pattern. :)
Gauge: roughly 7 rows = 1 inch; 7 stitches = 1 inch on size 7 needles. The Om chart is 20 stitches by 17 rows and this measured 3 inches (stitches) by 2.5 inches (rows).
Needles: US size 7 and US size 9 or size need to obtain gauge
Yarn: Aran or Worsted weight
You can use any yarn and needle combination that you like. If you use thinner yarn, increase the cast on stitches by 2 until you have enough to fit nicely around your palm, above your thumb. These mitts are meant to be fitted to the hand--so if you'd like them looser, increase your cast on.
This hasn't be tested by others, so please let me know if you find any errors!
Mitt Instructions
Cast on 34 on 9s.
Switch to size 7s on the first round of knitting.
Join in the round, place marker for the beginning of the round.
Rounds 1-12: K1P1 ribbing
Rounds 13-24: Knit
This should get you to up to the base of your thumb or slightly higher. You'll now begin to work back and forth in rounds. DO NOT JOIN the next 13 rows. You're creating the thumb opening.
Rows 25-37: Alternate a knit row and a purl row, continuing in stockinette stitch but in rows, ending with a knit row. You can slip the first stitch of each row to create a nice edge if you'd like.
In more detail:
Rows 25, 27, 29, 31, 33, 35, and 37: Knit
Rows 26, 28, 30, 32, 34, and 36: Purl
[This section leave the hole for your thumb. If you have a smaller or larger thumb (or different row gauge) adjust the number of rows--adjust by increments of 2 rows.]
After Row 37 join to the beginning of the round and start knitting again in rounds.
Rounds 38-47: Knit (this is 10 rounds in stockinette stitch)
Rounds 48-51: K1P1 ribbing
BO in pattern using size 9 needles, or stretchy bind-off of your choosing.
Repeat for the second mitt.
Adding the Om on the front of the mitts
Us the following chart to duplicate stitch the Om on the front of the mitt. Remember that you'll need at least 20 stitches by 17 rows to complete the chart. Try the mitt on first before stitching. I found it worked nicely to have the side of the Om closest to the thumb opening begin about 2 or 3 stitches inside.
I'd love to see your finished hand warmers!
He absolutely loved them and can't wait for it to get a bit cooler to wear them. (I'm also hoping to do a photo shoot with him to get some swanky yoga-riffic photos!)
Since he loved them so much, I really wanted to share the love and share my pattern and Om chart with you! So without further ado, here is the recipe for my Om hand warmers! Enjoy!
As always, feel free to sell items you make from my patterns, but please do not claim this pattern as your own, post any parts of it or the whole thing in other locations, or sell the pattern. :)
Gauge: roughly 7 rows = 1 inch; 7 stitches = 1 inch on size 7 needles. The Om chart is 20 stitches by 17 rows and this measured 3 inches (stitches) by 2.5 inches (rows).
Needles: US size 7 and US size 9 or size need to obtain gauge
Yarn: Aran or Worsted weight
You can use any yarn and needle combination that you like. If you use thinner yarn, increase the cast on stitches by 2 until you have enough to fit nicely around your palm, above your thumb. These mitts are meant to be fitted to the hand--so if you'd like them looser, increase your cast on.
This hasn't be tested by others, so please let me know if you find any errors!
Mitt Instructions
Cast on 34 on 9s.
Switch to size 7s on the first round of knitting.
Join in the round, place marker for the beginning of the round.
Rounds 1-12: K1P1 ribbing
Rounds 13-24: Knit
This should get you to up to the base of your thumb or slightly higher. You'll now begin to work back and forth in rounds. DO NOT JOIN the next 13 rows. You're creating the thumb opening.
Rows 25-37: Alternate a knit row and a purl row, continuing in stockinette stitch but in rows, ending with a knit row. You can slip the first stitch of each row to create a nice edge if you'd like.
In more detail:
Rows 25, 27, 29, 31, 33, 35, and 37: Knit
Rows 26, 28, 30, 32, 34, and 36: Purl
[This section leave the hole for your thumb. If you have a smaller or larger thumb (or different row gauge) adjust the number of rows--adjust by increments of 2 rows.]
After Row 37 join to the beginning of the round and start knitting again in rounds.
Rounds 38-47: Knit (this is 10 rounds in stockinette stitch)
Rounds 48-51: K1P1 ribbing
BO in pattern using size 9 needles, or stretchy bind-off of your choosing.
Repeat for the second mitt.
Adding the Om on the front of the mitts
Us the following chart to duplicate stitch the Om on the front of the mitt. Remember that you'll need at least 20 stitches by 17 rows to complete the chart. Try the mitt on first before stitching. I found it worked nicely to have the side of the Om closest to the thumb opening begin about 2 or 3 stitches inside.
I'd love to see your finished hand warmers!
Labels:
hand warmers,
knitting,
om,
original pattern,
yoga
Wednesday, May 29, 2013
Presenting Dr. Jessica
So remember that time when I used to update my blog somewhat regularly and then I just sort of...stopped? Well that is soon to be a thing of the past! I'm back!! AND...guess what?!?! I got my PhD! I'm officially a Dr!
Last Sunday (5/19) was my PhD Convocation and then last Wednesday (5/22) was the university Commencement and then my hooding ceremony. I am elated that I was able to achieve my dream of earning my PhD. I just wanted to share a few pictures from last week's festivities.
My mom, Sean (bf), Matt (best friend), Uncle Dan, and Aunt Cathy accompanied me last Wednesday to Commencement and hooding. I know that they were so very proud of me--maybe as proud or prouder than I was!
Here I am leaving the hooding ceremony. If you have never been to a hooding ceremony it is the time that we are officially presented our doctoral hoods that show the color of our degree (royal blue for me indicating PhD) as well as our school colors on the inside (although you can't see it in the picture, the inside of my hood is light blue and white for Columbia). Technically we aren't supposed to wear our hoods before being hooded, but we all did--call us rebels! Commencement took place prior to hooding and it just felt good to wear the hood to Commencement!
I actually have a funny story about the hood I received. We had the choice of either buying or renting both the hood and the gown for graduation. We all had to buy the tam. Well, after pricing out the outfit I decided that it would be best to rent the gown (it was over $600 to own) and buy the hood as a memento. If I was to buy the entire thing it would cost about $1,000 which is a bit too much for me right now for something I might not wear again. Anywho, back to my hood story. I had the bookstore ship my regalia to my house since I'm very rarely at school any longer. (Side note: I got a job much closer to home so I no longer have to go to the city every day!) So when my regalia arrived I was so excited to try it on! When I put the hood on I realized that it was red and royal blue inside, but didn't think more of it. When I got to school on Sunday for my Convocation my mom and I decided to visit the bookstore to purchase a few items. The bookstore has PhD gowns on display and I realized that the inside of the hood was school colors--Columbia blue and white. I checked with the bookstore staff and the assured me that as long as the velvet part of my hood was royal blue, the hood was correct. When I asked about the red inside the bookstore staff, Convocation staff, and even a Dean did not have an answer. So after my Convocation I was sure that I was sent the wrong hood in the mail--EVERYONE else had Columbia colors on the inside of their hood. Luckily the bookstore lent me a rental for the other ceremonies! At least my mom was able to spot me easily at Convocation!!
Ok, back to pictures. Here are a bunch of people from the Human Development department. HUD (as we call it) houses my program as well as other psychology programs. We were waiting to go into the hooding ceremony--notice that no one is wearing the hood :). I think someone commented that without the hood we look like a chef choir. Haha!
Here I am post Commencement posing with the "Columbia University--Congratulations to the Class of 2013" banner! I think I have a similar one from when I graduated in 2008 with one of my masters degrees.
Here I am with Sean and My mom after my Commencement. If you look to the left of the picture ALLL the way in the background you'll see a "sea of blue"--that's where I was sitting for the ceremony! Needless to say it was tricky to get to my family afterwards to take some photos! Luckily we got some nice ones :). There were over 30,000 people said to be at this years graduation.
Here I am with Uncle Dan (who is also my godfather) and Aunt Cathy! I know they had such a nice time at the ceremony. I'm so glad they came!
I do like that we got Low Library (which isn't a library) in the background of these photos. I do love the campus! Here I am with Matt and my mom. :)
And last, but certainly not least is a photo with my advisor. Dr. Johnson was a wonderful mentor for my dissertation and I'm very proud to have been able to work with him!
So that is it for now. Definitely expect some project posts coming soon! I've done a bit of knitting and crocheting during my blogging hiatus and would love to share the projects with you! Until then, happy yarn time! :)
Labels:
Columbia University,
Commencement,
family,
graduation,
Matt,
Mommy,
PhD,
Sean
Saturday, February 23, 2013
The Dillon Hat
I have been making custom items for my friends and family, at their requests, for some time now. However, recently it has really taken off and I have had lots of requests for custom knit and crocheted goods. I can do custom items in many ways--my friends can describe an idea and I'll find patterns that fit the description or they can show me various photos of knit/crocheted items and I can come up with a design that combines the aspects of each photo that they like best.
Up until recently I had never tried to create an item from a photograph that was NOT of a knit/crocheted item. At the end of 2012 one of my friends asked me if I would be able to make a newborn-sized hat that looked like the family's bulldog. She sent me a few different photographs of the dog (what a cutie!) and with a bit of trial and error, I was able to produce a crocheted version of him!
Here are two of the pictures of Dillon that I used as my inspiration.
Here is the final hat that I made!
And here it is on little Gianna! She is just so adorable and could make any hat look cute! :) I'd like to send a big thank you to her mommy, Jazmin, for sending me these pictures of her little one in the hat and letting me use them on my blog :).
Up until recently I had never tried to create an item from a photograph that was NOT of a knit/crocheted item. At the end of 2012 one of my friends asked me if I would be able to make a newborn-sized hat that looked like the family's bulldog. She sent me a few different photographs of the dog (what a cutie!) and with a bit of trial and error, I was able to produce a crocheted version of him!
Here are two of the pictures of Dillon that I used as my inspiration.
Here is the final hat that I made!
And here it is on little Gianna! She is just so adorable and could make any hat look cute! :) I'd like to send a big thank you to her mommy, Jazmin, for sending me these pictures of her little one in the hat and letting me use them on my blog :).
Labels:
craftini marini,
crochet,
custom
Wednesday, February 13, 2013
FO: Puppy Hats
Not too long ago one of my favorite blogs, Repeat Crafter Me, posted a new free "Puppy Hat" pattern. This pattern has a very high cuteness factor! I love this blog for a few reasons 1) it's loaded full of great ideas and patterns (she is the creator of the Owl Hats that I've made so many of), 2) it's well written and fun to read, and 3) she let's you use her patterns as you wish as long as you give her credit. I absolutely love that because then I can use her patterns and make things to sell--perfect!
So far I've made two of these puppy hats. One in child size and one in the smallest size (0-3 months).
Pattern: "Puppy Hat" from Repeat Crafter Me
Yarn: Both hats are made from Vanna's choice yarn--oatmeal for the puppy part and other colors for the accents.
Size: The blue hat is made in child size and the pink hat is 0-3 months.
Hook Size: H, 5.0 mm for both hats.
Notes: Love the pattern and everything about it. Super quick and super cute. You can make a few of these in a day. My only problem was that the child size hat fit my head....and I don't have a tiny adult-sized head. My gauge was spot on, so I'm not really sure if I had some other issue. Good thing is that children's heads grow--so it will fit my friend's nephew perfectly at some point.
So far I've made two of these puppy hats. One in child size and one in the smallest size (0-3 months).
Pattern: "Puppy Hat" from Repeat Crafter Me
Yarn: Both hats are made from Vanna's choice yarn--oatmeal for the puppy part and other colors for the accents.
Size: The blue hat is made in child size and the pink hat is 0-3 months.
Hook Size: H, 5.0 mm for both hats.
Notes: Love the pattern and everything about it. Super quick and super cute. You can make a few of these in a day. My only problem was that the child size hat fit my head....and I don't have a tiny adult-sized head. My gauge was spot on, so I'm not really sure if I had some other issue. Good thing is that children's heads grow--so it will fit my friend's nephew perfectly at some point.
Monday, February 11, 2013
FO: Sweet and Swingy Dress
My friend Alyson is expecting her second baby in March--a girl!! I'm so excited for her family and their upcoming addition. I've been crafting away making a few things just for the occasion! I've known Alyson and her family since I was in the 6th grade...so for like 18 years (WOW!) I'm actually going to be in her sister Alexandra's wedding in October as a bridesmaid :)...Alex and I are yarn buddies and have been pals since we met in our 6th grade class...but I'm getting off topic.
Pattern: "Sweet and Swingy Dress" by Ellen Gormley which is available in the May/June 2009 issue of Crochet Today!
Yarn: TLC Baby Solid in powder pink with accents of Patons Beehive Baby Sport in Big Girl.
Hook Size: H, 5.0 mm
Size: According to Ravelry, this pattern runs REALLY small. Since the baby isn't born yet, I figured that this wouldn't be too much of an issue and picked the 12 month size to make.
Notes: I have to say that I don't think this is a dress sized for a 12-month-old. I don't have a baby to compare it to, but it just seems small...which is perfectly fine because the baby will only be a few months old this summer and maybe it will fit perfectly then! I really loved making this dress. The way to do the accent crab stitch around certain areas is genius!
I decided to add a little flower to the front of the dress. I did this for two reasons-- 1) the back of the dress is identical to the front and I wanted to tuck my ends and start the accent colors on the back of the dress to make any finishing less noticble and 2) I wanted a little more detail and I didn't like the look of the three rounds of detailed edging on the bodice of the dress. The flower is called the "10 minute flower" by Boomie and can be found for free online. Scroll down to the bottom of the page for the English instructions.
What would I change if I was do make this again (which I will be doing)? I would either make one shoulder have buttons so that it would be easier to put on/take off of the baby or try and incorporate a slit and button hole on the back of the dress. The neck line is stretchy and wide-ish, but I just would feel better knowing it would be easy for mommy or daddy to dress the baby.
Pattern: "Sweet and Swingy Dress" by Ellen Gormley which is available in the May/June 2009 issue of Crochet Today!
Yarn: TLC Baby Solid in powder pink with accents of Patons Beehive Baby Sport in Big Girl.
Hook Size: H, 5.0 mm
Size: According to Ravelry, this pattern runs REALLY small. Since the baby isn't born yet, I figured that this wouldn't be too much of an issue and picked the 12 month size to make.
Notes: I have to say that I don't think this is a dress sized for a 12-month-old. I don't have a baby to compare it to, but it just seems small...which is perfectly fine because the baby will only be a few months old this summer and maybe it will fit perfectly then! I really loved making this dress. The way to do the accent crab stitch around certain areas is genius!
I decided to add a little flower to the front of the dress. I did this for two reasons-- 1) the back of the dress is identical to the front and I wanted to tuck my ends and start the accent colors on the back of the dress to make any finishing less noticble and 2) I wanted a little more detail and I didn't like the look of the three rounds of detailed edging on the bodice of the dress. The flower is called the "10 minute flower" by Boomie and can be found for free online. Scroll down to the bottom of the page for the English instructions.
What would I change if I was do make this again (which I will be doing)? I would either make one shoulder have buttons so that it would be easier to put on/take off of the baby or try and incorporate a slit and button hole on the back of the dress. The neck line is stretchy and wide-ish, but I just would feel better knowing it would be easy for mommy or daddy to dress the baby.
Sunday, February 10, 2013
FO: Baby Bibs
You'll see in the coming posts that I've been busy making a bunch of baby items. It seems as if a lot of my friends have been asking me to make them stuff or having babies! Here is one of my favorite patterns for a handmade bib.
Pattern: "I-Love-Stockinette Baby Bib" by Laura Treadway which is available as a free Ravelry download.
Yarn: Lion Brand Cotton-Ease in plum and berry.
Needle size: US 7
Size: As written, no modifications.
Notes: I really enjoyed using cotton-ease for these bibs. I love the way that they turned out. The drape is nice and they really don't curl that much. I've used Knit Picks comfy worsted before, but I've found that they really curled a lot. Also, I did not slip any edge stitches on these bibs and I think that might have helped them to not curl? Just a thought.
Pattern: "I-Love-Stockinette Baby Bib" by Laura Treadway which is available as a free Ravelry download.
Yarn: Lion Brand Cotton-Ease in plum and berry.
Needle size: US 7
Size: As written, no modifications.
Notes: I really enjoyed using cotton-ease for these bibs. I love the way that they turned out. The drape is nice and they really don't curl that much. I've used Knit Picks comfy worsted before, but I've found that they really curled a lot. Also, I did not slip any edge stitches on these bibs and I think that might have helped them to not curl? Just a thought.
Friday, February 8, 2013
FO: Shades of Yellow and Green
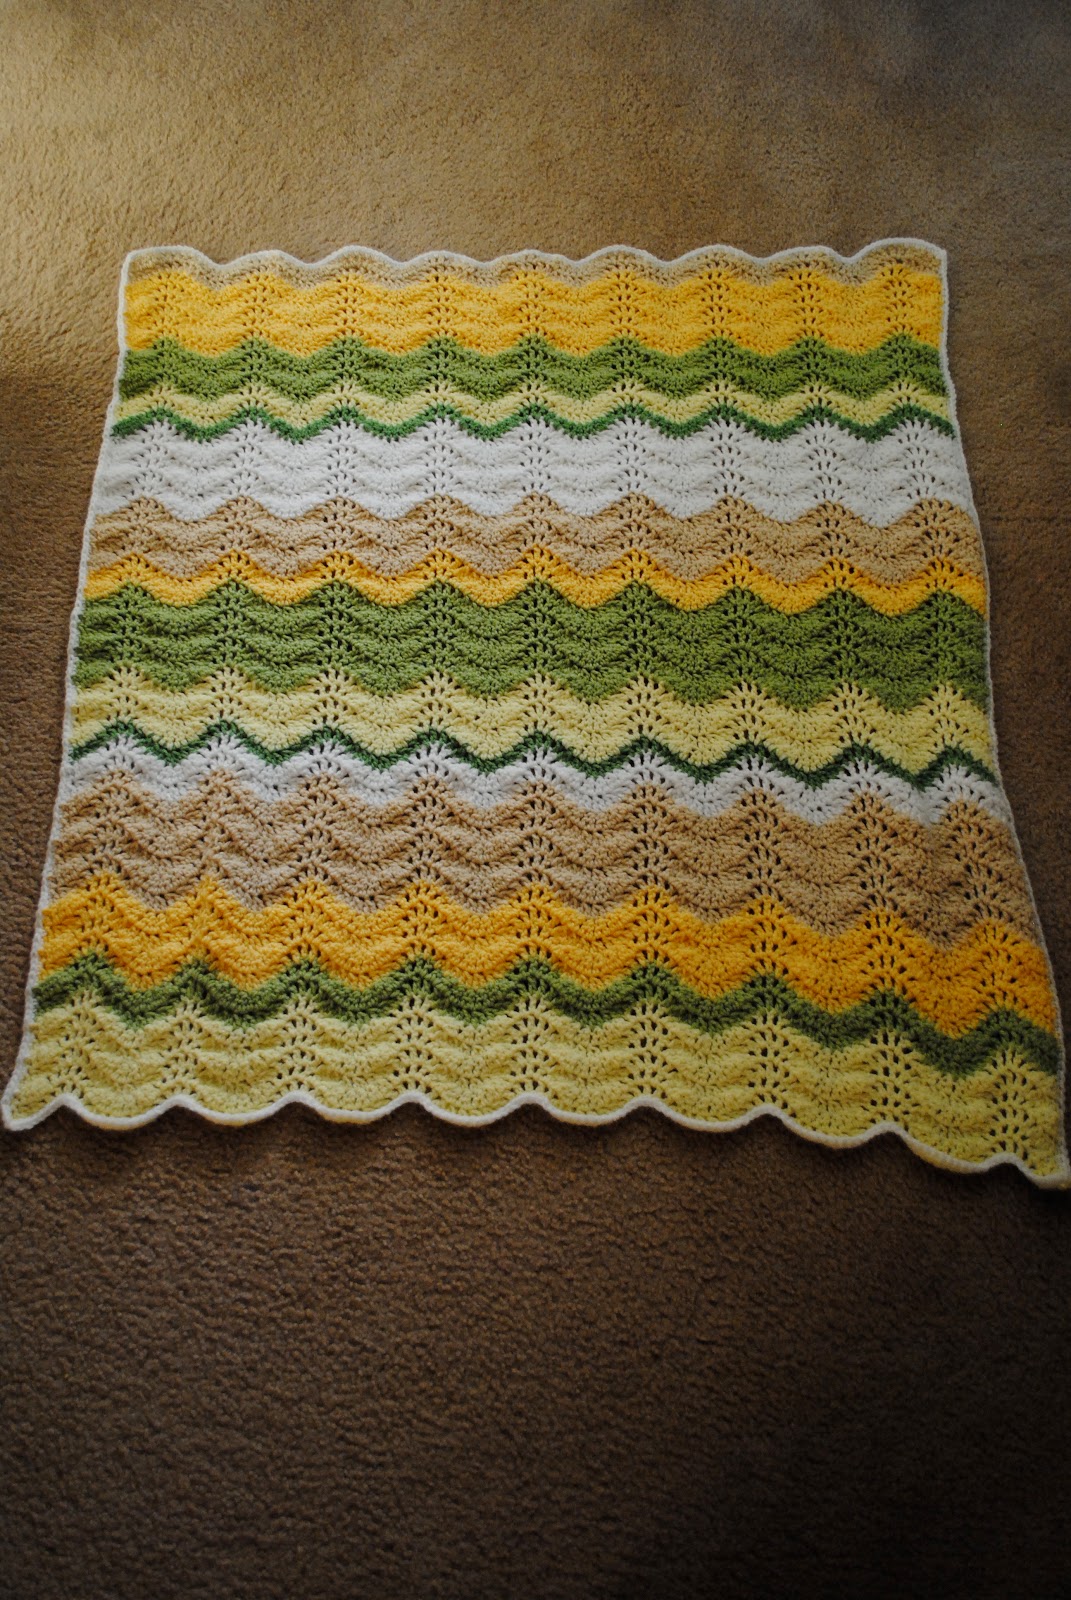
My first project of 2013 (which took me just over a week) was a baby blanket. My friend requested a ripple baby blanket in gender-neutral colors including yellow and green. This is what I came up with.
Pattern: "Shades of Coral" by Jan Eaton, found in the book 200 Ripple Stitch Patterns
Yarn: Mostly Vanna's Choice and Vanna's Baby and a little bit of Lion Brand Pound of Love. I picked greens and yellows first and then added beige and white to round out the colors. I like using acrylic for baby items because of its softness, durability, and how easy it is to care for.
Hook size: I, 5.5 mm.
Size: I measured the blanket agains the quilt I used to have in MY crib as a baby ("Quilty"). Although I didn't record the finished dimensions, this blanket would be called "crib-sized" so it will won't be out grown for a while (if ever).
Notes: This was a really great and fast project. I actually began at the end of December (12/30) and finished it by January 9th! I tucked the ends in as I went along, so that I didn't have to worry about them after it was done. The border is one row of single crochet. I didn't do any adjustments along the top and bottom ripples as I made the border. I'm very happy with this project!
Pattern: "Shades of Coral" by Jan Eaton, found in the book 200 Ripple Stitch Patterns
Yarn: Mostly Vanna's Choice and Vanna's Baby and a little bit of Lion Brand Pound of Love. I picked greens and yellows first and then added beige and white to round out the colors. I like using acrylic for baby items because of its softness, durability, and how easy it is to care for.
Hook size: I, 5.5 mm.
Size: I measured the blanket agains the quilt I used to have in MY crib as a baby ("Quilty"). Although I didn't record the finished dimensions, this blanket would be called "crib-sized" so it will won't be out grown for a while (if ever).
Notes: This was a really great and fast project. I actually began at the end of December (12/30) and finished it by January 9th! I tucked the ends in as I went along, so that I didn't have to worry about them after it was done. The border is one row of single crochet. I didn't do any adjustments along the top and bottom ripples as I made the border. I'm very happy with this project!
Tuesday, February 5, 2013
FO: Crocheted Flower Motif String Bag
I came across this pattern when I was looking for Christmas gift ideas. I actually made the pink bag for one of my friends, but we've yet to seen each other for the holidays, so I might just end up with it for myself. The pattern is a really nice pattern (although I found that some of the counts were off). It's free and quick (took about a week of off and on crocheting) and easy! I definitely recommend this one.
Pattern: "Crochet Flower Motif String Bag" by LisaJedi Gwinner and it's available as a free Ravelry download.
Yarn: The pink bag is made using Knit Picks Cotlin yarn in Cerise and took about 1.75 skeins. The green bag is made using Elsebeth Lavold Hempathy in colorway 017 and took about 1.5 balls. Both I had in my stash--the Cerise from my spring/summer crocheted cardigan and the Hempathy from my I-91 Shop Hop vacation.
Hook size: F, 3.75 mm
Size: The size was as written in the pattern. My only issue was that I ended up with more loops in the final round than the pattern states. I think I had 111 or something like that. Really, it's not a big deal because all you're doing is the top edging and then adding the handles. This happened both times I made the bag. To compensate for this difference I just recalculated where to place the handles of the bag. Easy peasy :).
Notes: The bag holds WAY more than you think it would. Seriously this bag is awesome! You can see that I have a few boxes of cereal in the first one and I think some cans and whatever else I had in the kitchen that I could stuff into the bag :). The green one is now being used as my "stuff carrying bag" for yoga--which is working out really well! My towel and clothes are all sweaty and gross (eww but AHH) when I'm done with class and the meshiness of this bag allows it to dry really easily.
Sunday, February 3, 2013
FO: Dallas Cowboys Football Hat
One of my friends saw the football hats that I made last year and asked me if I would be able to make her daughter a Dallas Cowboys themed football hat. Here's what I came up with.
Pattern: "Football Hat"by Brenda K. B. Anderson available in the 8th issue (December 2011/January 2012) of Knitting Today! (aka Your Knitting Life).
Yarn: I actually had trouble finding yarn that seemed to suit the Dallas Cowboys colors. My friend said that it would be ok if I had to use navy, so that's ultimately what I ended up with. A lot of the blues were too bright and a lot of navys were too dark. I ended up using Loops and Threads Impeccable in Navy and Vanna's choice in Silver Heather.
Needle size: US 7's for the ribbing and US 8's for the rest.
Size: Adult size with my usual modifications--2 extra rows on the ribbing (done in K2,P2) and two extra rows on the top stripe before and after the decreases.
Notes: My friend's daughter wanted braided tails, so I cut twice as many lengths of navy as of silver and threaded them through the bottom of the ear flap and then braided them. I was braiding with two navy sections and one silver. I'm very happy with the final product as is my friend! I hope her daughter likes it just as much. This is a great pattern to make (I've made 4 of them so far). My only issues are that the ear flaps curl, they are thin, and the laces detail is a bit of a pain to sew on. Other than that, I totally recommend it!
Happy Super Bowl!
Subscribe to:
Posts (Atom)